Sunday, February 21, 2016

Episode 4: Apple Bread from the Betty Crocker Recipe Card Library


Great news! Eat at Lu's has a new website at http://eatatlus.com/


Recorded on Superbowl Sunday, Lisa makes an embarrassing admission as she bakes Apple Bread from the Betty Crocker Recipe Card Library. While cooking she talks about the difference between enriched bread dough and having inclusions in the bread. She also talks about the history of Betty Crocker and theorizes why recipe cards indexes became so popular in the 1970s.


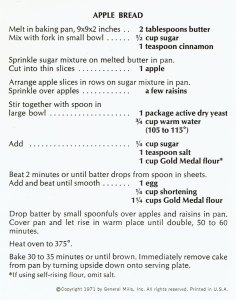
The original recipe card. I would reduce the baking time just slightly. My apple bread was a little over baked even though I only baked it for 30 minutes.


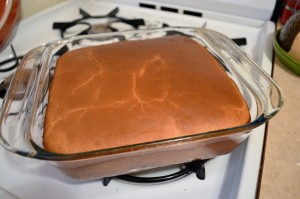
Turning the bread out onto a plate was a bit scary, but it came out ok. If you make the dish, remember to run your knife around the perimeter of the cake to help separate it from the baking dish.


My apple bread doesn’t look nearly as nice as the one in the original picture, but I blame that on it being a bit over baked.


It may not be pretty, but it sure is delicious. I couldn’t remember the name of the apple I used when I recorded the episode, but I checked later. They were gala apples. They had a slight tartness which worked well with the sweet caramel.

Saturday, February 13, 2016

Episode 3 - Seven Seas Casserole


Since it's officially Lent, I thought that I would cook up some tuna casserole.  This recipe was originally developed by Minute Rice in the mid-1950s.  It appeared in Time Magazine in 1955 and on the back of Minute Rice boxes starting in 1957.  I initially found the recipe in Ceil Dyer's book Best Recipes from the Backs of Boxes, Bottles, Cans, and Jars which was published in 1979.  While cooking, I talk about the different types of food preservation and the history of canning.


The original advertisement/recipe published in time magazine.

I found the recipe in this book.


After the first 10 minutes in the oven.  Doesn't it look appetizing?

So many peas.
One plus side of this recipe is that there was minimal mess.
Like us on Facebook!  Eat at Lu's: The Podcast

Saturday, February 6, 2016

Episode 2 - Flaky Biscuits from Microwave Cooking for One


In this mini-episode, I make Flaky Biscuits with a recipe from the book Microwave Cooking for One.  While making biscuits, I talk about the science of flaky, golden brown biscuits.

This recipe called for some specialized equipment in order to achieve a golden brown exterior.  I found my Corning Microwave Browning Skillet on ebay, but I have seen them at thrift stores and yard sales.  The Microwave Cooking for One website talks at length about the Browning Skillet: https://www.microwavecookingforone.com/Charts/Browner.html

The technological advantage that Corning's Microwave Browning Skillet has over other microwave cooking vessels is its heat conductive coating on the bottom.  Pictures of my browning skillet can be seen below.  The grey area on the bottom is the special coating to help promote browning.


The skillet did promote browning; although, the browning was uneven and the quality was not nearly as high as I could have achieved in the oven.  At least the biscuits were flaky.


On the mess scale, this recipe was not terrible.  Aside from a few measuring cups, I only dirtied one bowl, a microplaner, the countertop, a fork, 3 mise-en-place bowls, a biscuit cutter, and the Browning Skillet.  Definitely less of a mess than last week.


Saturday, January 30, 2016

Eat at Lu's: The Podcast - Episode 1


Good news everyone!  Eat at Lu's is now a podcast.  In our first episode, we cook three recipes from Marie T. Smith's Microwave Cooking for One, the saddest cookbook ever.


Microwave Cooking for One was published in 1986 and 2002.  I bought my copy on amazon.com, but I have seen copies at thrift stores.  I chose three recipes from the cookbook to prepare: carrot soup, mushroom loaf, and hot orange drink.  All of which were cooked in the microwave!

While this book was dubbed "the saddest cookbook ever" by SF Weekly, the history of the book is much more positive than it seems.  In this podcast, I explore the motivation of the author to share her cooking secrets with the world, and the history of the book itself.

Although Marie T. Smith passed away in 1987, her daughter carries on her legacy on the website  https://www.microwavecookingforone.com/  This website provides tips for microwave cooking, as well as some additional recipes.


Below are the results of my gustatory adventure of culinary delights:

Carrot Soup with a touch of sour cream and a dash of cinnamon
Mushroom Loaf.  It is not a pretty dish.
A slice of Mushroom Loaf on a sandwich.
It is only moderately more attractive this way.

My lunch for that day:
Hot Orange Drink, Carrot Soup,
and Mushroom Loaf.  


My kitchen after recording.
The mess was surprisingly manageable.


Saturday, October 3, 2015

Apple Dumpling Pull-Apart Bread with optional dipping sauce

This is probably one of the most complicated recipes I have ever made.  It is probably also one of the most delicious.  It's the apple dumpling we know and love, transformed into bite size form!

I recommend that you completely read through the recipe before you start.  It isn't a difficult recipe, but it does have a lot of steps.

Dough

  • 1 cup milk
  • 1/3 cup unsweetened apple juice
  • 1/4 cup granulated sugar
  • 2 teaspoons salt
  • 2 tablespoons unsalted butter (melted)
  • 3 cups bread flour
  • 2 1/4 teaspoons (1 package) active dry yeast
  • 1 teaspoon cinnamon


Caramelized Apples

  • 4 Fuji or other apples, peeled, cored, and cut into 64 ½-¾ inch chunks
  • 2 tablespoons maple syrup
  • 1 teaspoon ground cinnamon
  • 1 tablespoon fresh lemon juice
  • 1 tablespoon unsalted butter

Maple Coating/ Glaze
*note: the apple dumplings are dipped in the coating, and the remainder of the coating is later used as a base for the glaze

  • 1 cup maple syrup
  • 2 teaspoons ground cinnamon
  • 1/2 cup (1 stick) unsalted butter
  • ½ cup apple cider (for glaze)
  • 2 teaspoons vanilla (for glaze)
  • 1/3 cup pecan pieces (for glaze)

Make the Dough:
Mix 2 cups flour and yeast in stand mixer fitted with a beater blade. Turn machine to low and slowly add the heated liquid mixture. Beat on medium speed for 3 minutes.

Switch to the dough hook, gradually add the remaining flour (add more or less as necessary) until dough clings to the hook and almost cleans the sides. Knead until the dough is smooth.

In microwave safe bowl, heat milk, apple juice, sugar, salt and butter to 120° to 130°. Stir to dissolve sugar.

Turn dough onto lightly floured counter and knead briefly to form a round ball. Coat a large bowl with nonstick cooking spray. Place dough in bowl and coat surface of dough with cooking spray. Cover bowl with plastic wrap and rise in a warm place until dough doubles in size, about 2 hours.

Caramelize apples:
Melt the butter in a sauté pan over medium heat.  Add maple syrup, lemon, and cinnamon and stir to combine.  Add the apples and sauté until apples are softened and all the liquid is evaporated.  Allow to cool. 

Make the Maple Syrup Coating:
Heat butter, maple syrup, cinnamon to a small sauce pan and heat.  Cook on medium for about 20 minutes until the mixture thickens slightly.  Remove from heat and allow to cool.

Butter a 12-cup Bundt pan liberally.

Make Dumplings:
After dough has fully risen, punch down the dough and cut it into 64 pieces.  With floured hands, flatten out a piece of dough, add a chunk of apple, and wrap the apple chunk like a dumpling so the apple is completely wrapped in dough.  Dip the dumpling into the Maple Syrup Coating, and add it to the bundt pan.  Repeat 63 more times taking care to stagger the dough balls to build layers.

When all of the dumplings have been dipped and placed into the Bundt pan, put the remaining maple syrup coating into a container and refrigerate (you’ll be using the leftovers for the glaze). Cover Bundt pan tightly with plastic wrap and place in refrigerator.

Approximately two hours before you want to bake your Monkey Bread, remove it from the refrigerator and let the dough come to room temperature and begin to rise.

Preheat oven to 350°. Unwrap pan and bake until top is deep brown and caramel begins to bubble a little around edges, 30 to 35 minutes. Cool in pan for 5 minutes, then turn out on platter and allow to cool slightly, about 10 minutes.

For the glaze:
While the apple dumpling bread is baking, put the remaining maple syrup coating to a saucepan and add ½ cup of apple cider.  Cook the glaze until it reduces into a syrupy consistency (about 20-30 minutes).  Add the pecans and vanilla.

Spoon mixture over the pull-apart bread after it has been removed from the Bundt pan.


Dipping sauce (optional)

  • 1/2 cup maple syrup
  • 1 cup apple cider.
  • 1 tablespoon corn syrup (optional)
  • 1/3 cup of heavy cream or coconut milk
  • 1 tablespoon of butter
  • 1/4 teaspoon of cinnamon
  • 1 teaspoon of vanilla

Boil maple syrup, cider, and corn syrup until it reduces by 3/4. When it's nearly finished reducing, heat the cream/milk, butter, cinnamon, and vanilla in the microwave for 30-45 seconds (This will help keep the sauce from breaking).

Add the warmed milk mixture to the boiling cider/maple syrup and stir.  Serve alongside the pull-apart bread for a little extra apple-y goodness.

This recipe is partly based upon this recipe: http://www.barbarabakes.com/overnight-apple-fritter-monkey-bread/


Saturday, September 26, 2015

Onion-fig Jam Recipe


This is a variation on my onion jam recipe that I posted a few years ago.  The figs add just a touch of sweetness and a little texture.  I served them on some homemade cream cheese and herbed oatmeal crackers, but I imagine that it would be delicious on a hamburger or on chicken.

Ingredients:
4 tablespoons olive oil
6 red onions, large thinly sliced
1 pound figs, quartered lengthwise and then sliced width-wise
1/3 cup sugar
1/3 cup balsamic vinegar (not the aged sweet stuff)
1/8 cup cider vinegar
1/2 cup brandy
1/2 cup honey
4 sprigs fresh rosemary, stems removed, leaves chopped
1 tablespoon + 1 teaspoon mustard seed
1 1/2 teaspoon salt
1/2 teaspoon ground pepper

Heat oil in a large skillet (I used a 5 quart deep sauté pan) until it just barely begins smoking, add onions and cook until soft and translucent on medium high heat.

Once softened, lower heat to medium or medium low, and continue to cook onions until brown and caramelized. This will take forever (as long as three hours), but it is worth the wait.

Add remaining ingredients and cover the pot.  Cook on low for 10-15 minutes so the figs break down.
Uncover and continue to simmer on low stirring occasionally until the jam reaches a thick, jam-like consistency.

Yields about 5 cups.

If desired, follow standard processing procedures to preserve your jars of jam or just pop it in the refrigerator. Unprocessed, it will last about 6 weeks in the refrigerator.

Thursday, May 28, 2015

Eat at Lu's: Recipe Directory - Four Year Anniversary Edition!

Eat at Lu's: Recipe Directory - Four Year Anniversary Edition!: Honey Cornbread Muffins Holy crap!  Yesterday was the four year anniversary of my blog and by sheer coincidence I decided to updat...